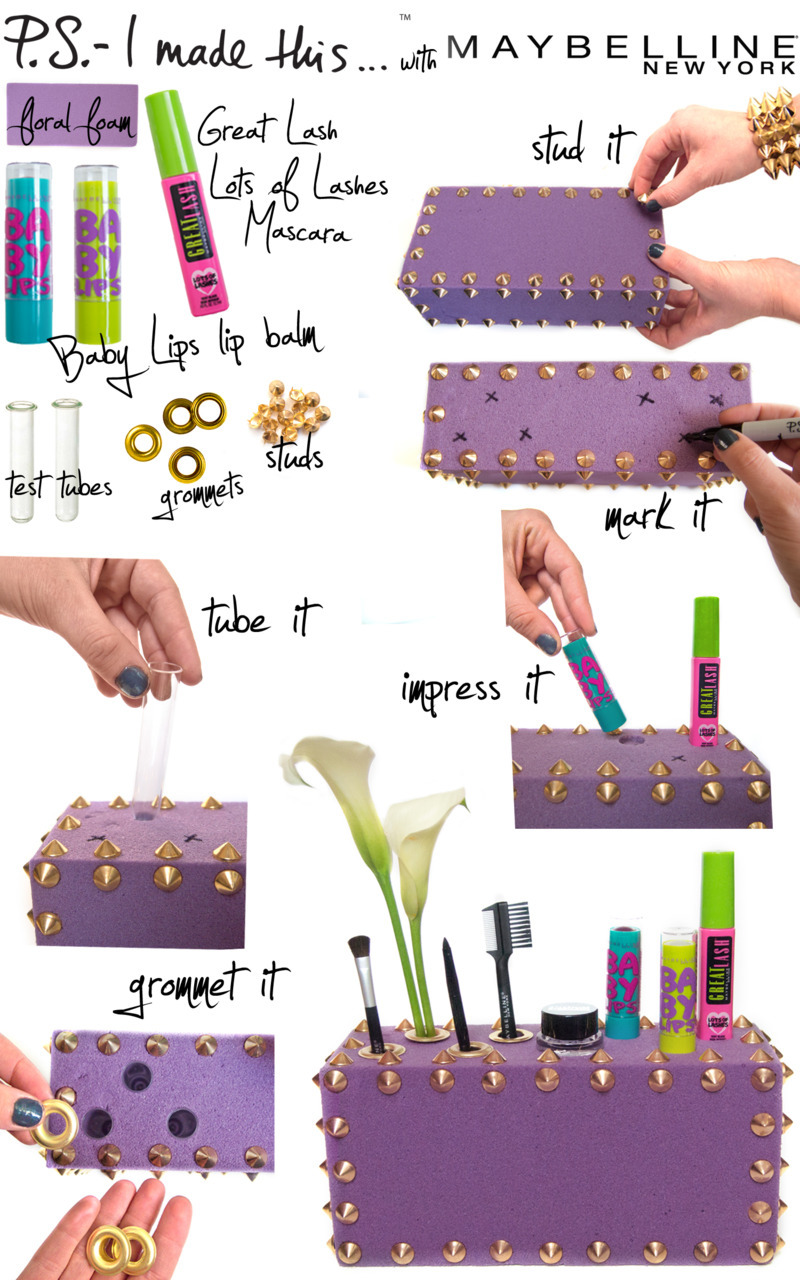
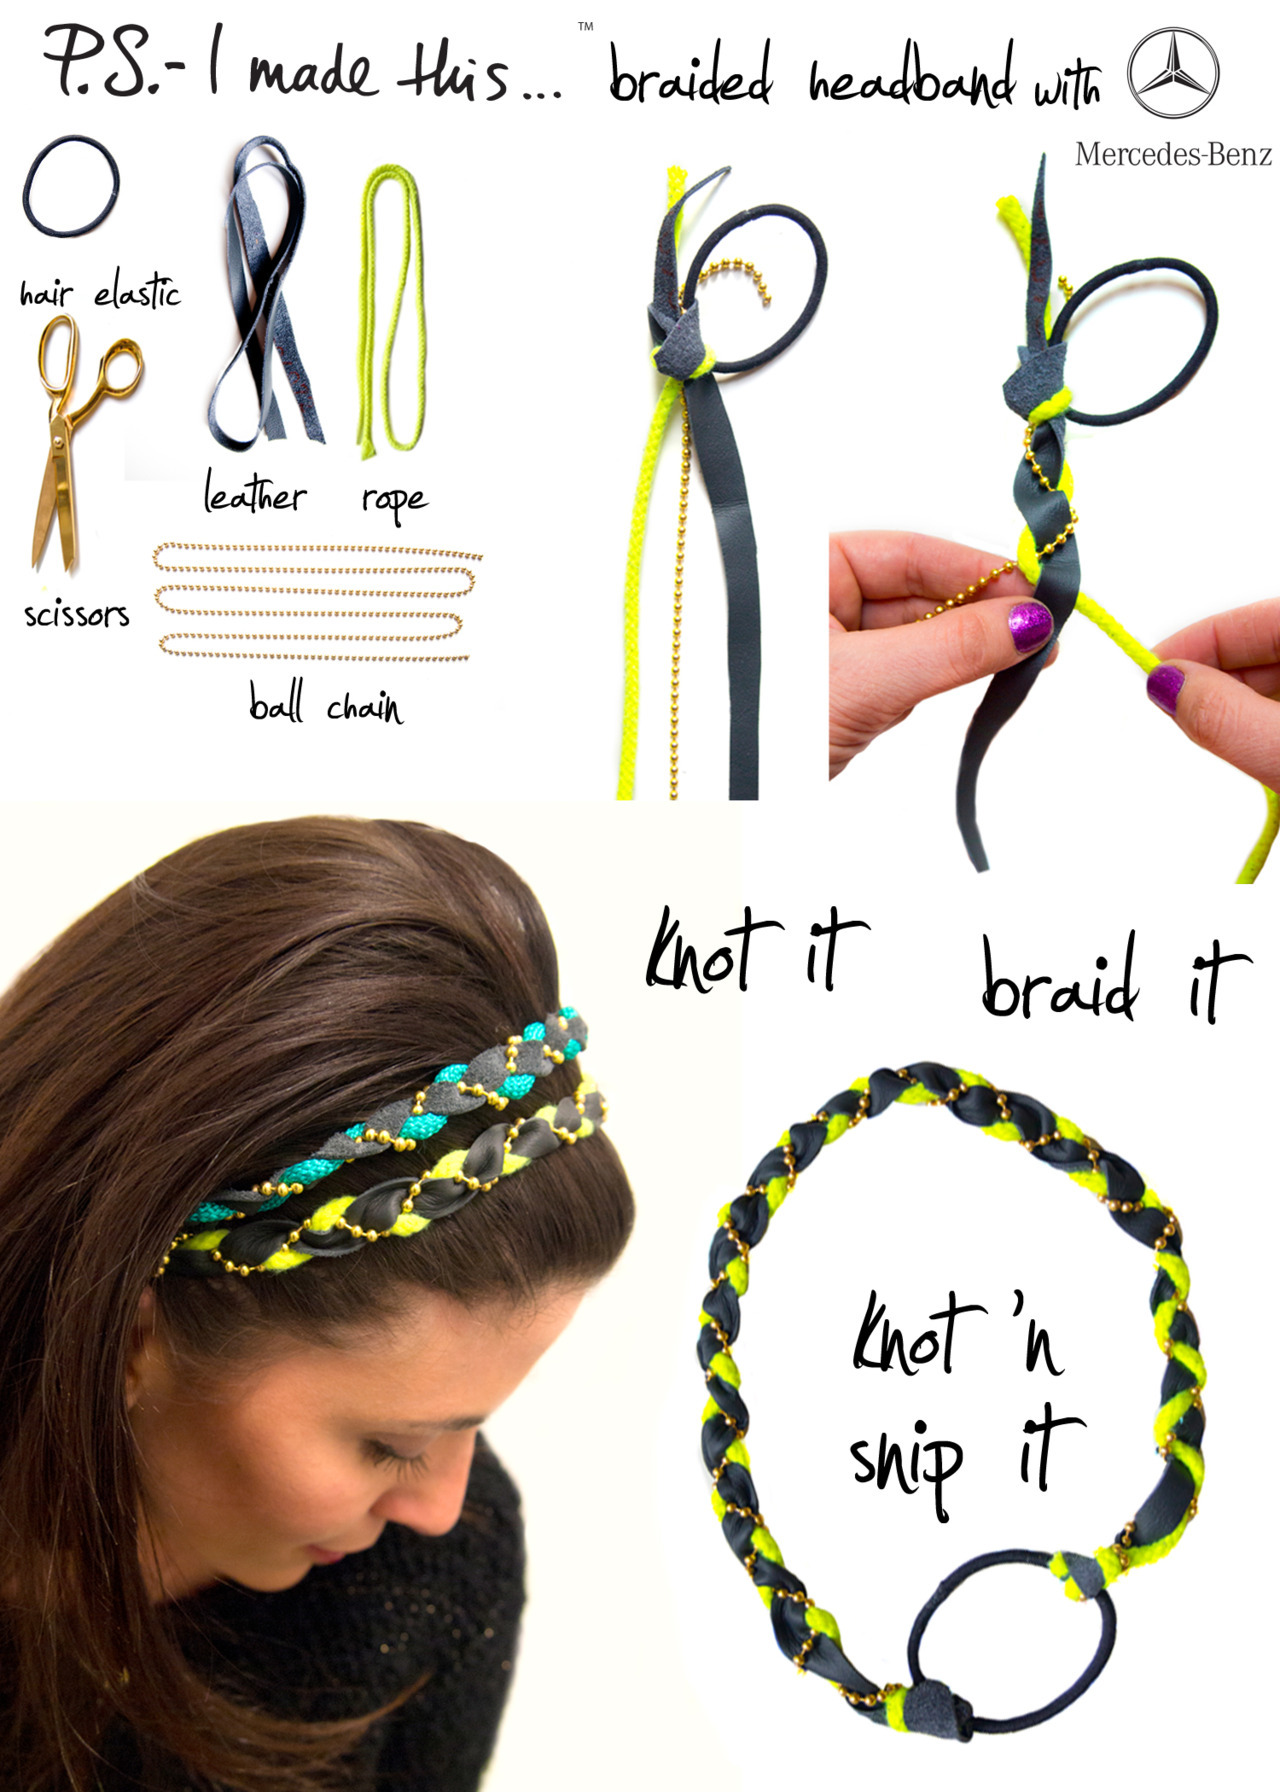
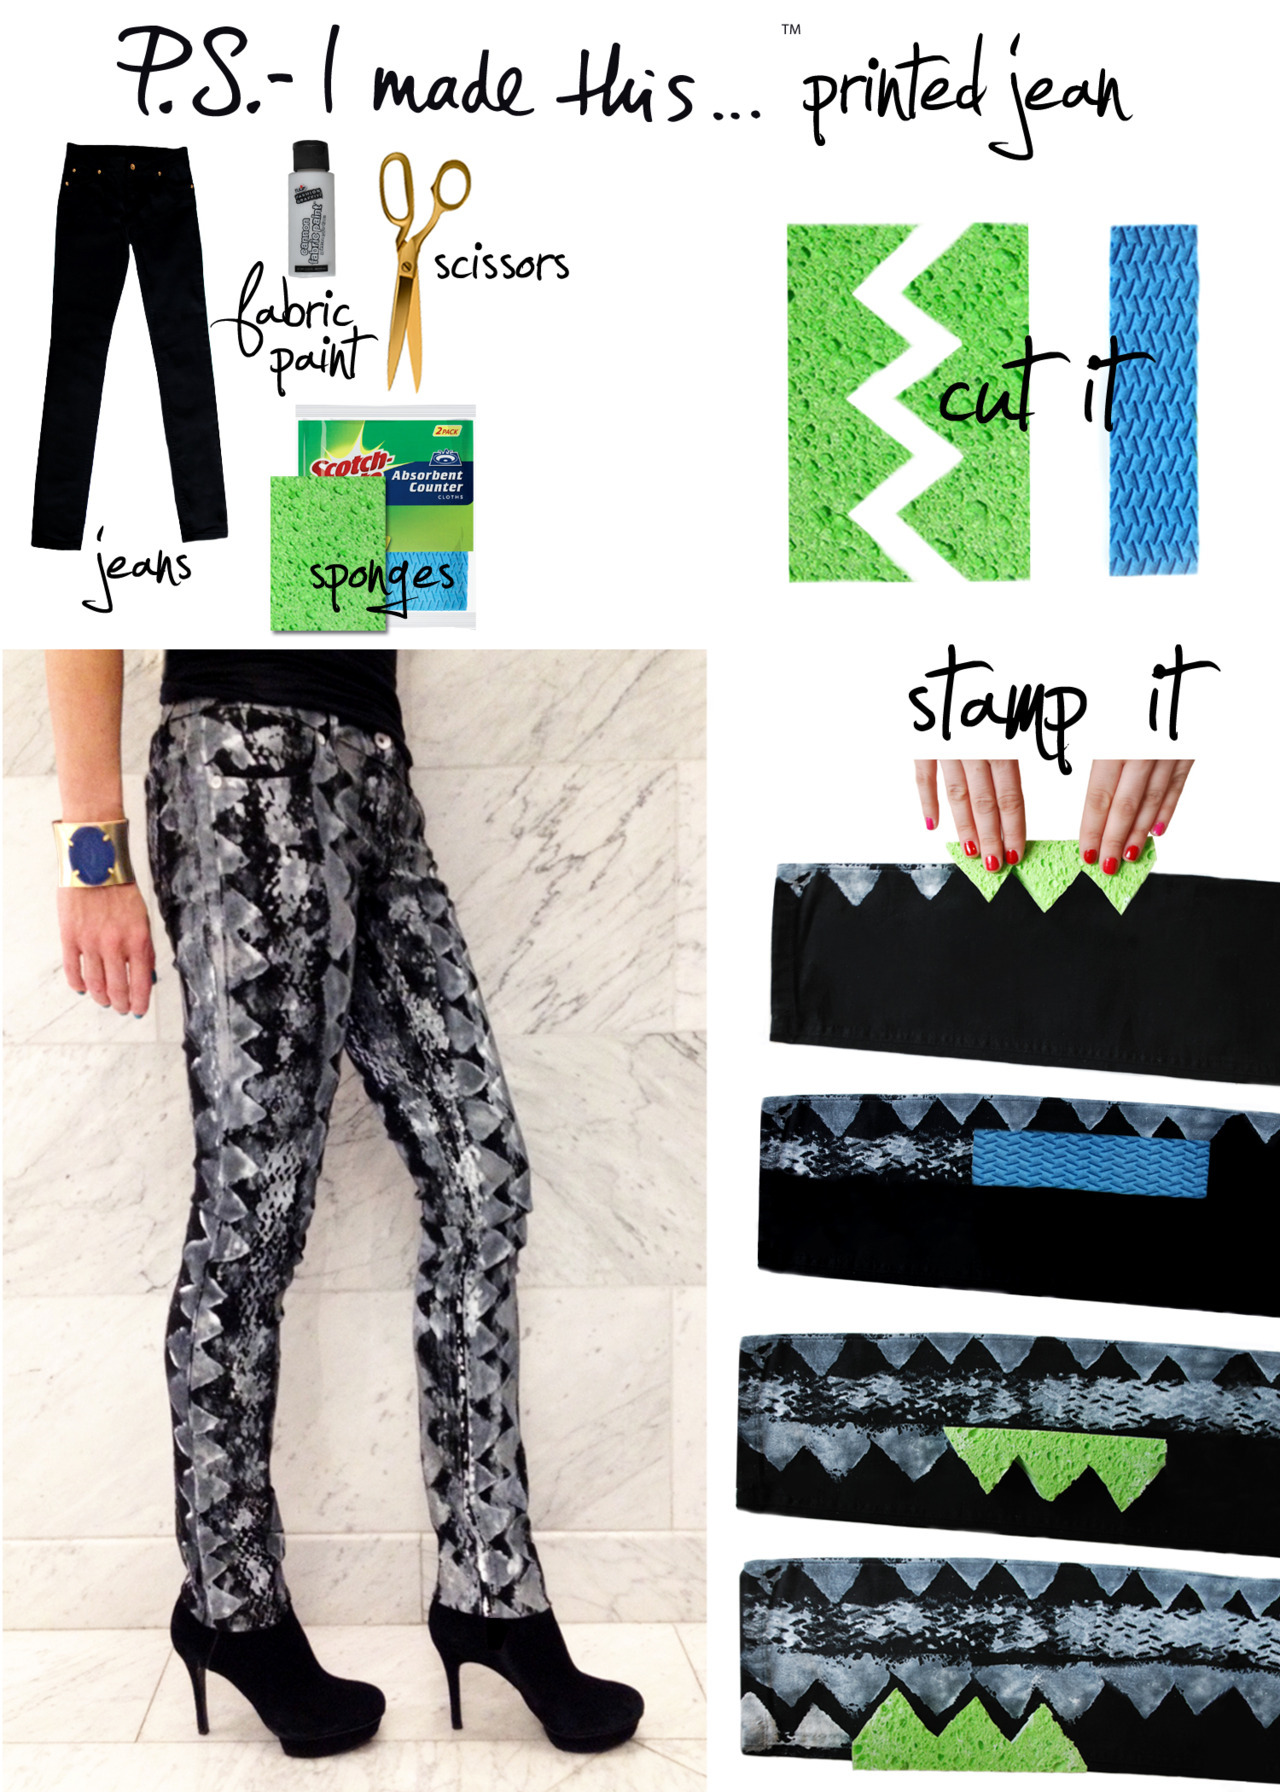
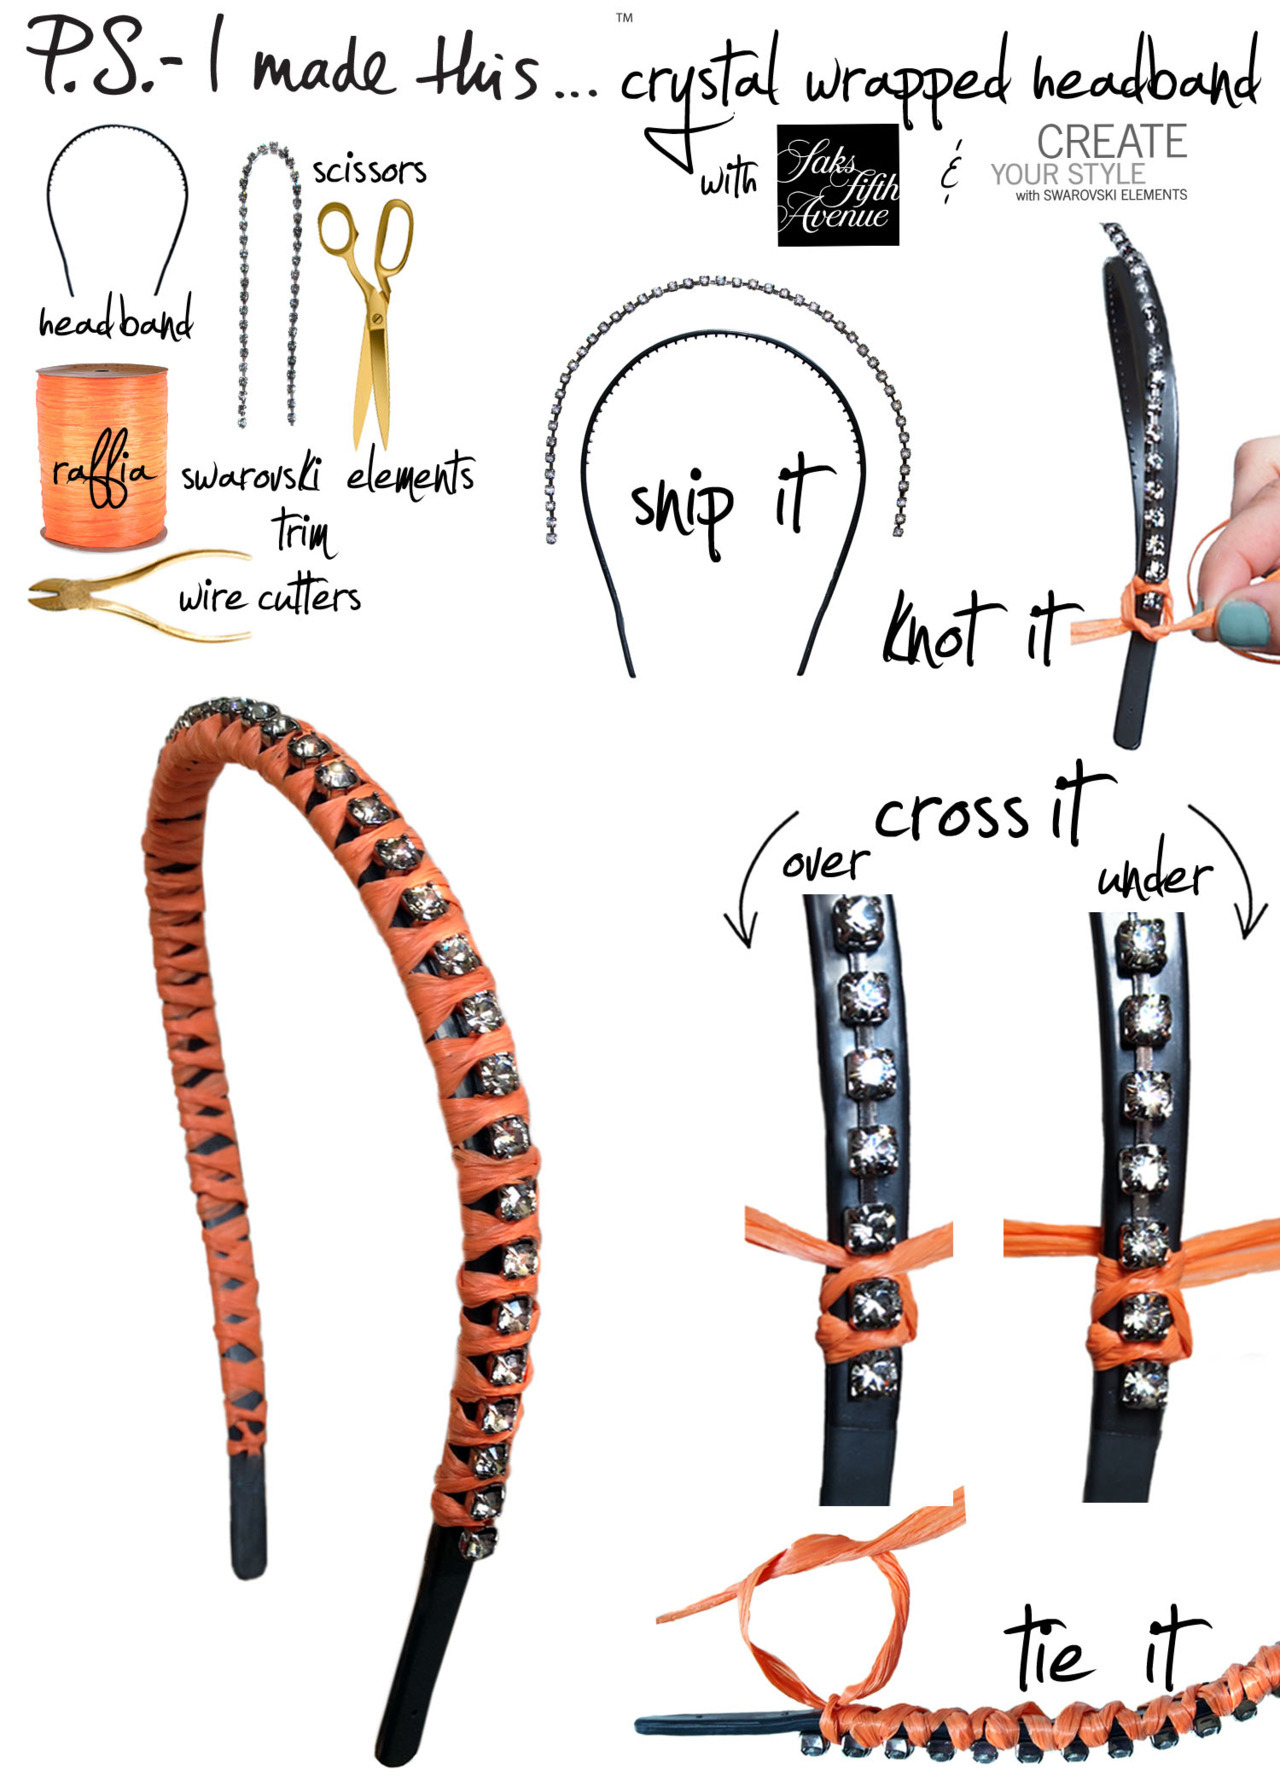
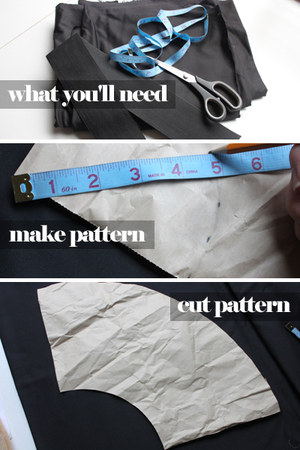
Sunday, May 20, 2012

Detatchable peplum

Black-peplum-skirtBlack-peplum-skirt
Black-peplum-skirt
Black-peplum-skirtBlack-peplum-skirt

WHAT YOU’LL NEED:
- pattern paper & a pencil
- measuring tape
- about a yard of fabric
- some super wide elastic
- scissors
- sewing machine

TUTORIAL:

[ MAKE PATTERN ] – Start with creating your pattern for the skirt. You’ll need to know your waist measurement and the length that you want your peplum to be. We’re going to need to get the radius of a circle because we’re making a pattern for a basic circle skirt. Take your waist measurement, add two inches and then divide it all by 2?. This will give you the radius measurement for your inner circle. I did about 4.75 inches for the radius, which is about a size 4 to 6 skirt.
You can draw a circle very easily by holding your measuring tape at the corner of your paper & drawing multiple points at the same distance away from that point. My second circle was about 7 inches greater radius than the first, making the length of the peplum about 7 inches! Draw a second circle that is 7 inches greater on your pattern :) Any questions?

[ CUT PATTERN] – Cut out your pattern piece. It should be a quarter circle.

[ CUT FABRIC ] – Fold your fabric into quarters & then cut using the pattern you just created.

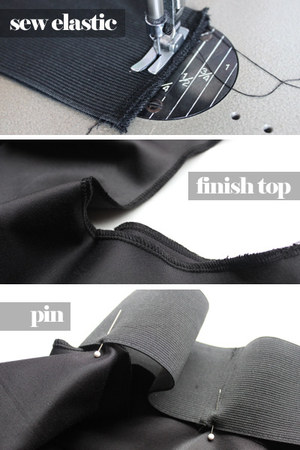
[ SEW ELASTIC ] – Use your waist measurement and add an inch for seam allowance to determine how long the elastic should be. Cut the elastic & then finish the edges by serging or zigzag stitching the ends. Then sew the ends together.

[ FINISH TOP ] – Serge or zigzag stitch the top of the peplum (the inner part of the circle). You need to do this to prevent the fabric from fraying!

[ PIN ] – Pin the serged edge of the fabric to the elastic. Start by pinning a single point and then pin the opposite mid-points of the circles. Then pin at the quarter-way points.

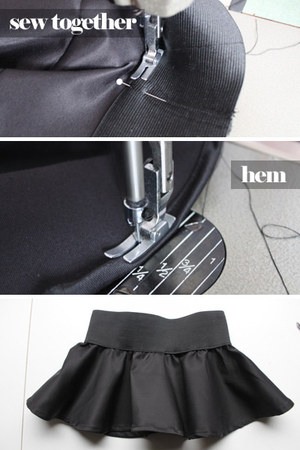
[ SEW TOGETHER ] – Sew the elastic waistband and fabric together with a single straight stitch. You’ll notice that the fabric is longer than the elastic, so you’ll need to stretch the elastic while you are sewing. This will cause the fabric to gather very slightly.

[ HEM ] – Make a simple rolled hem at the bottom & sew with a straight stitch. Make sure to iron the fabric after & you’re done!


Pinned Image
Pinned Image

No sew bikini


It's that time of year again! Time to get all up in the sun and sand (don't forget your SPF!). 

Bikinis are expensive and sometimes it's tough to find the right sizes, so this year, Faith and I made our own. It was super easy, in fact-- this style is a NO SEW! That's right!

All we did was take a string bikini bottom and opened it up onto our elasticized fabric. Using the bikini bottom as a pattern, we cut out around the shape, leaving extra fabric on the hips for ties. Next, for the bando top, we literally cut a 6" wide strip of fabric, and cut 3 fringes on either end to tie together in front.

The whole thing took about ten minutes, and cost about $5. No stress and no fuss. Race you to the pool!

Bralet

Hot-pink-bralette-topHot-pink-bralette-topHot-pink-bralette-topHot-pink-bralette-topHot-pink-bralette-topWHAT YOU’LL NEED:
- pattern paper & a sharpie
- a strapless or balconnet style bra
- about a 1/4 metre of a knit fabric
- scissors
- sewing machine

TUTORIAL:

[ TRACE ] – Start with tracing the outline of half of your bra. Be sure to carefully trace the shape of the underwire (inside the cup) as well.

[ DRAW ] – Draw a straight line from the center gore down (the center front) and draw a slightly diagonal line at the end where your bra buckle is. Draw a line at the bottom & that is the hem of your bralette. Mine was about 4.5 inches from the bottom of the underwire. Be sure to measure your natural waist & check that the length of that bottom line is about one quarter of your waist measurement. Make sense?

[ CUT PATTERN ] – This pattern was drawn to the exact measurements, so there were no seam allowances left. Cut it out & you’ve got a half pattern!

[ CUT FABRIC ] – Place your pattern on your fabric (folded in half along the center front) and cut out the fabric piece. Be sure to leave a 1/4" seam allowance around ALL sides, since it was not added to the pattern.

[ PIN ON ] – Fold the fabric under & pin it to the bottoms of the cups. This might be a little tricky because of the underwires, so be careful!

[ FINISH ENDS ] – I wanted to keep the closure of the bralette as the hook and eyes from the original bra, so I decided to make the back of the top with a keyhole. To do this, I just made a large angled cut of the top corners of the back & hemmed the edges. This will leave the band of your bra exposed & make a cute keyhole shape at the back as well. So just cut & hem!

[ SEW TO BRA ] – Now you can sew your fabric to your bra! If your bra has an underwire, it will help if you change your foot to a zipper foot. That way you’ll be able to get the straight stitch to lean right against the wire. Also, when sewing the fabric onto the band, try stretching both the band and your fabric so that your band remains stretchy.

[ BACK SEAM ] – See those little pink lines I drew on the photo? Sew those ends of the fabric together face to face.

[ HEM ] – Using a cover stitch machine or a zig zag stitch, hem the bottom of your top.

[ EMBELLISH ] – This step is optional, but you can now embellish your bra with any rhinestones, studs, beads, zippers or lace! I went with little pearl beads :) & voila!
3Floral boots DIY 4Pinned ImagePinned Image

Saturday, May 19, 2012

Naturally Fair ?


1. If you have a bathtub, then pour two cups of whole cream milk into the water,
 add a lemon and throw in a couple handfuls of ground oats.
While you soak in the warm water, the natural skin bleaching properties of milk and lemon will work away at your skin. Oats have exfoliating, nourishing as well as lightening qualities.
You will see your overall skin tone become fairer by doing this twice a week for a month.

In case you do not have a bath tub, then you can soak some freshly cut lemon slices in a cup of milk, strain after an hour, add two spoons of rosewater and thicken with yoghurt. This paste can be used as a natural skin whitening cream.

2. Exfoliate your face regularly.
Dead cell buildup makes the skin look dull and darker than it really is.
Allow fresh skin cells to grow by timely removal of dead skin, and you’ll see a natural glow.
If you want to become fair naturally, exfoliation should become a regular part of your beauty regime.

3. When you choose your daily use skin creams, look for an ingredient called hydroquinone.
This is a melanin inhibitor. Melanin is responsible for pigmentation in our skin and inhibiting it makes us look fair. When you use a cream with this ingredient, you must never forget to apply sunscreen outdoors, because hydroquinone reduces skin’s melanin content, making us more prone to sun-damage.

4. You can bleach tanned areas such as the face, neck and even hands and feet with one of the cosmetic bleaches available in the market to become fair.

5. Swimming in chlorinated water regularly (but not in the sun) will also lighten overall body skin tone as chlorine is a bleaching agent.

6. Make a face pack with turmeric, olive oil and ground gram flour (besan) and use on a regular basis for exfoliating and lightening complexion. Turmeric also adds a golden glow to the face, which helps you become fairer.

7.For a fair complexion, mix equal amounts of egg white and lemon juice.
Heat on a frying pan till it thickens. Cool in the refrigerator. Applying this paste on your face and neck daily will show a gradual lightening of skin.

8. Mash a few quarter of a cucumber along with the skin. Apply this paste all over face and neck and keep for 20 mins before rinsing.

9. Honey, milk, lemon, oatmeal and brown sugar can be combined to make an excellent fairness scrub at home.

10. Another great recipe for fair skin is fennel seeds brewed in water. You must boil 2 tsps of fennel seed in a glass of water for an hour on low flame. The water will reduce significantly by this time. Strain out the seeds and add a tbsp of buttermilk or curd whey to this preparation. Apply all over face and neck. Rinse off after 15 mins.

11. Use the pulp of papaya to cleanse twice a week to become fair. Or you can use premade papaya face packs and face washes by popular cosmetic companies. But fresh is always better.

12. Buy a serum containing vitamin C to regularly dab on your face for a fair look. Vitamin C is a natural bleach. The natural alternative to this is lemon used in most face packs for fair skin, for it is a great source of vitamin C. Applying a mix of lemon juice and yoghurt once daily can show results in as little as two weeks.

13. Always use a good sunscreen of adequate SPF content as per the sun conditions of wherever you stay to maintain your fair complexion. In summers, one usually needs SPF 40 to 60 depending on the harshness of the sun and your exposure to it. Even in cloudy weather, a minimum of SPF 20 is required in most Indian cities.

14. Incorporating many fruits and veggies in your diet and drinking tons of water will ensure you get the right vitamins and antioxidants essential for healthy and fair skin. Dull and dry skin tends to look darker. Keep your skin hydrated if you want to appear fair.

15. Consuming fish oil capsules or eating flaxseeds will nourish your skin with omega fatty acids and keep it younger-looking, fresh and supple. Healthy skin is a must if you wish to become fair, because faults and damage show much more on fair complexions.

Monday, April 30, 2012

You've Became STUDDED ! :)

Q: Still clinching onto summer short shorts?
A: Clutch ‘em!
Turn your denim daisy dukes into a super cute clutch.  Cut the bottoms off.  Flip inside out.  Stitch the bottom.  Turn right-side up.  Stick velcro along the wasit band for closure.  Stud the top with metal grommets to give it an edge.  Use for an evening bag, make-up case, or a chic tool bag ;)
its a denim DO for Fall!

leopard bag

Lions and Tigers and Leopards… Oh MY!  This Fall, Leopard has proven to be one of the hottest trends were following from runway to reality.  With no time to spare and a desperate need for a fabulous tote bag, I rushed to Muji (one of the greatest Japanese stores) for an inexpensive bag, snagged some fun colored Sharpie paint pens, and tape.  This chic design and Sharpie paint pens transformed my canvas bag into a chic personalized bag in minutes.  I of course looked to Louis Vuitton  and Goyard for the racing stripe inspiration!
PS- PETA would totally approve of this leopard bag!

Ruffles!

We are all giddy and ruffling our feathers to kick off the summer season.  Keeping cool and looking good is easy, breezy and effortless with the help of our light-hearted friend, the ruffle!  Whimsical breaths of girlish charm show a playfulness and elude to an anything-goes-attitude!  Mixing the ruffle with the ever-popular asymmetrical trend results in a summer crush that wont let you down.
Purchase a pack of white tees (the more tees, the more ruffles you can create).  Cut off a few inches from the bottom hem.  The wider the panel, the larger the ruffle. Cut off one sleeve with sharp fabric scissors for the asymmetrical neck.  Scrunch, pin, and sew to the diagonal neckline.  If your tee is too loose around the underarm, add a few stitches or pin it to achieve the perfect fit! 
Purchase a pack of white tees (the more tees, the more ruffles you can create).  
Cut off a few inches from the bottom hem.  
The wider the panel, the larger the ruffle. 
Cut off one sleeve with sharp fabric scissors for the asymmetrical neck.  
Scrunch, pin, and sew to the diagonal neckline. 
 If your tee is too loose around the underarm, add a few stitches or pin it to achieve the perfect fit! 


I’ve been roped in to a DIY obsession that’s got me all tied up at the moment.  I cannot stop weaving and knotting for the life of me!  Currently, were seeing the macrame and summer crochet trend all over the place.  Don’t think hippie-chic looks and handwoven plant hangers- Macrame and crochet looks are back in a modern and wearable way.  Chanel’s SS10 collection is bursting at the seams with this delicate, light-weight design that’s to die for.  Oscar de la Renta proved this trend is gonna stick around for a bit as we spotted some macrame cameos in his Cruise 2011 show as well.
To create you own version of this macrame-style rope necklace, grab a spool of rope and loop around your thumb.  Weave over and under your fingers, back and forth until you create 2 rows of rope of each finger.  Remove the bottom string over the top on each finger, until you leave just one row left.  Continue to weave over and under, always creating 2 rows of rope and pulling the bottom rope over the top.  After you’ve created your woven design, remove from the fingers, loop the strand through all the finger holes, add beads and chain- and you’re ready to roll!To create you own version of this macrame-style rope necklace, grab a spool of rope and loop around your thumb.                            Weave over and under your fingers, back and forth until you create 2 rows of rope of each finger.                       Remove the bottom string over the top on each finger, until you leave just one row left.                              Continue to weave over and under, always creating 2 rows of rope and pulling the bottom rope over the top.  After you’ve created your woven design, remove from the fingers, loop the strand through all the finger holes, add beads and chain- and you’re ready to roll!

beadss

P.S.- LOVE IS IN THE AIR! Whether you heart St.Valentine’s Day or simply steer clear of it, we should always remember to love ourselves day in and day out, (Hallmark holiday aside).  I will trade a box ‘o chocolates for jewelry any day of the week, and I’m sure most of you would too!  Here is my DIY love life advice: Don’t wait around for your crush to come through with bijoux…. P.S.- MAKE IT YOURSELF!  Follow in the footsteps of leading sweethearts Audrey Hepburn and Carrie Bradshaw, who always seemed to be doused in layers of pearls, while looking for their leading man.
To create a stand out, chunky, pearl statement necklace just reach for 3 strands of long pearl or beaded necklaces (experiment with different colored options), wide ribbon, and a decorative brooch.  CLICK HERE TO WATCH THE HOW-TO VIDEO with Fashionista.com and get ready to fall head over heels in love with this lovely neck candy!  xoxo

Countertop Cosmetic Solution


Department store cosmetic countertops should be called the land of decadent organization.  Perfectly placed products look colorful and clean, which make us crave them even more.  It’s time to roll out the red carpet for the new beauty starlet that’s on everyone’s lips, Maybelline New York’s Baby Lips Lip Balm.  Never have we ever found a pout pleaser that has color, moisture, the cute-factor, and j’amazing packaging all in one.  Baby Lips Lip Balm has inspired our DIY Beauty box!  Due to it’s fun and fresh look, we want to display it, at eye level- everyday!  The purple (aka “Peach Kiss”) case inspired the base for the beauty box of the same hue.
To create, use a block of floral foam (avail in lots of fun colors), and stud it up! Use a marker to plan out your beauty box placement.  Use desired products to pierce the foam directly by applying a bit of pressure, and created a spot carved out specially for it.  Make sure your Lip balms, mascaras, and other products have just enough depth to stand up straight and stay put.  Push test tubes, all the way down, into foam so the top lip is flush with the foam’s surface. Insert makeup brushes.  For a finished look, place grommets on top of the tubes opening.  Turn a tube into a bud vase for that final touch!
You now have yourself the perfect lip pleaser and a countertop cosmetic solution.  P.S.- Long live the Maybelline New York Beauty Box!-To create, use a block of floral foam  and stud it up! 

-Use a marker to plan out your beauty box placement.  

-Use desired products to pierce the foam directly by applying a bit of pressure, and create a spot carved out specially for it.  

-Make sure your Lip balms, mascaras, and other products have just enough depth to stand up straight and stay put.  

-Push test tubes, all the way down, into foam so the top lip is flush with the foam’s surface. Insert makeup brushes. 

- For a finished look, place grommets on top of the tubes opening.  Turn a tube into a bud vase for that final touch!

Braided Headband

Stand out as an Icon of Style.  Get inspired by the epitome of innovation, sleekness, technology and sportiness. Follow the Mercedes-Benz iconic road map for luxury and celebrate style with this DIY fashion project.  Inspired by iconic essentials and unique modern design , we created a j’amazing braided headband using Mercedes-Benz leather and layered in texture,  to top it off.  After all, it is Mercedes-Benz Fashion Week and we want to cruise around in style.
To create, cut a piece of leather approximately 1/2” wide and 2.5-3 ft long.  Add a bright cord (or ribbon) and ball chain.  Knot all three materials together onto a hair elastic and braid.  Once you have a braid long enough to wrap around your head, knot off on the other end of the  hair elastic.  Be sure to pull tight to make sure it’s secure. Snip the ends and you’re ready to brave a bold braided accessory!
To create, cut a piece of leather approximately 1/2” wide and 2.5-3 ft long.  
Add a bright cord (or ribbon) and ball chain.  
Knot all three materials together onto a hair elastic and braid.  
Once you have a braid long enough to wrap around your head, 
knot off on the other end of the hair elastic.  
Be sure to pull tight to make sure it’s secure. 
Snip the ends and you’re ready to brave a bold braided accessory!

fabric stamping

http://29.media.tumblr.com/tumblr_m0j3r3Vw7b1qzymieo1_1280.jpgP is for Personality, which is precisely what printed jeans ooze of.  Glide your way into this mainstream must-have with this denim DO!  Get inspired by Balmain’s coveted graphic jean with a snakeskin twist.  Bulgari’s Serpenti Collection of chic bracelets, bags, wallets and watches has slithered into our hearts, helping our style shine bright.  Infuse a luxe snakeskin-esque pattern with a pop of print… it’s  just what the DIY doctor ordered.
 To create:  use a solid colored pair of jeans for the base.  Use scissors to cut zig zag shapes out of kitchen sponges and textured sponge cloths into 2” inch strips.  Apply an even coat of fabric paint onto the sponge surface and press directly onto the denim starting from the outside edge.  Hold sponge for a few seconds allowing paint to absorb into the material.  Continue to create vertical patterns down the legs.  For a more textured effect, overlap sponges as you go. Let one side dry completely before turning over to repeat the process on the back.

headband

Spring fever is in full effect.  Follow your heart with a headband as you step into the season with some extra sparkle and shine.  Mix luminous and rich materials with earthy textures for a match made in heaven.  Get inspired by crazy cool crystals from  SWAROVSKI ELEMENTS and springtime hues for a haute headband thats to DIY for! 
 To create: Measure and cut SWAROVSKI ELEMENTS CUPCHAIN TRIM   to fit the top of the headband.  Chain should cover all but the bottom inch of the headband. Cut 4 feet of colored raffia and  fold in half.  Secure chain to the headband by knotting raffia onto the end of the cupchain trim.  Begin wrapping from the bottom and continue all the way around securing chain. Use the cross-over method going over and under each crystal you wrap.  Knot off once you reach the end and snip off any remaining raffia.


P.S.- You’re invited to dive into DIY this week with Erica Domesek where she will be at Saks Fifth Avenue in Atlanta, New York City & Palm Beach Gardens. Join Erica and create headbands, necklaces, bracelets and other j’amazing accessories with SWAROVSKI ELEMENTS.  Click here for details…See ya there!

Friday, April 27, 2012

inspiration

Lucky Charms are magically delicious and so is JEWELRY!  One of my favorite jewelry designers, Dana Lorenz of Fenton/Fallon continues to wow us season after season with her over-the-top statement pieces, terrific textures, and sparkling situations. Dana recently invited me and a few other fab friends over and let us loose in her shop. She graciously gifted charms and broken pieces of past collections for a special P.S. project!  I loved the idea of blinging out my fall bag with a bag charm using her fun elements.
To create a chic bag charm, re-purpose broken or old jewlez, charms, pendants, pieces, basically anything fun you can get your hands on.  Tie your bits and bobs onto string or cording and secure to a binder ring. Make sure you hang at different lengths to create a staggered effect. Clip onto your bag with a carabiner clip and you are one leading lucky charm lady!

DIY Summer EarringsSupplies: - 2 seashells, from the beach or the store. I got mine at M&J Trimming in NYC. - 2 gold charms - Jewelry pliers - Wire cutters (if your pliers don't have them) - E6000/super glue - Pair of earring posts and backings - Paintbrush - Acrylic paint of your choice. I mixed neon pink & orange (& later some white) - Metallic acrylic paint (that matches your charms)


Supplies:

- 2 seashells, from the beach or the store. I got mine at M&J Trimming in NYC.
- 2 gold charms
- Jewelry pliers
- Wire cutters (if your pliers don't have them)
- E6000/super glue
 - Pair of earring posts and backings
- Paintbrush
- Acrylic paint of your choice. I mixed neon pink & orange (& later some white)
- Metallic acrylic paint (that matches your charms)


1) Paint the shells whatever color you'd like, and let dry.


2) Twist the loops off of the charms with the pliers. Use the wire cutters - or the wire cutter part if your pliers have it - to even out the metal.


3) Glue the pieces onto shells.

4) Accent with some metallic paint, if you'd like; I used gold. Let dry.

5) Glue the earring posts to the back of the shells, and let dry overnight.

Sweater Tube Scarf


Supplies:


- Knit sweater. I used a Large Mens sweater, purchased at Goodwill.
- Sewing pins
- Thread
- Needle or sewing machine 
- Scissors 
- Measuring tape, if needed
-------------------------------------------------------------
1) Lay the sweater flat. You'll be cutting out the entire "body" of the sweater, which will essentially be your entire scarf.


2) Cut down both sides of the sweater.  I was able to use the sweater's natural lines as a guide.


           - Cut straight across the top.


3) Trim if necessary. My entire sweater rectangle was about 20 inches wide, but I cut off about 4 inches of it. Trimming totally depends on preference and the size of your sweater, of course!


4) Flip the sweater pieces so that the right sides are facing each other. Pin down the sides about an inch away from the edge.


5) Sew both sides right up.


6) Roll the top raw edge in, and pin all around


7) Sew across to finish off the top edge. 


Old Sweats..

Maegans-DIYs-materialsRefashion Sweat Pants DIY-1Refashion Sweat Pants DIY-2Refashion Sweat Pants DIY-3Refashion Sweat Pants DIY-4Refashion Sweat Pants DIY-5Refashion Sweat Pants DIY-6Refashion Sweat Pants DIY-8