Saturday, December 31, 2011
Friday, December 30, 2011
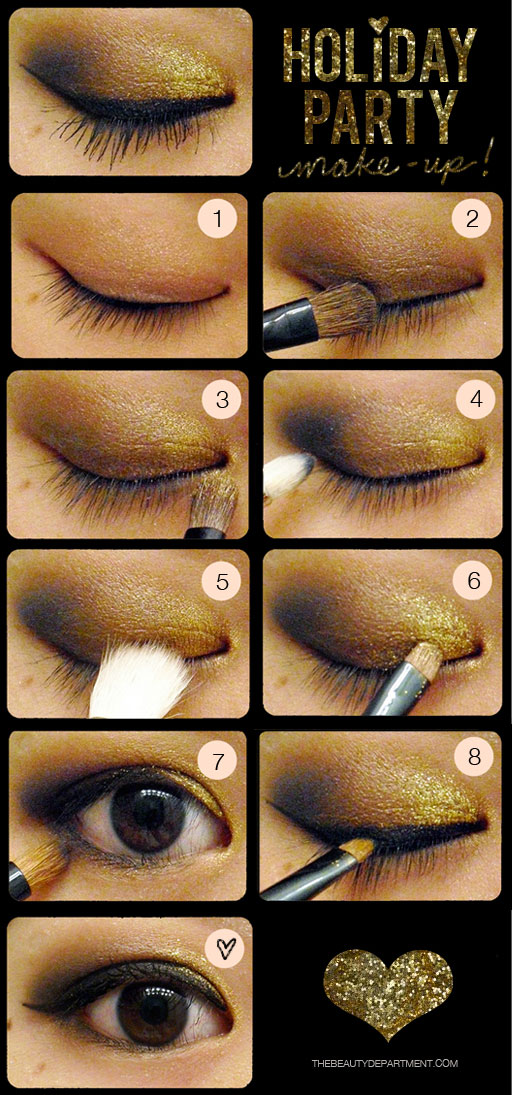
1. Prepare your eye by using an eyeshadow primer or foundation so that your eyeshadow will last longer.
2. Apply a chocolate brown eyeshadow with a flat shadow brush.
3. Next, apply a gold eye shadow towards the inner corner of your eye.
4. Sweep a black eyeshadow on the outer corner of your eye with a blending brush, creating the sideways “V” shape.
5. Blend out any harsh lines created by the black + gold eye shadows.
6. This is the fun part! Pour a very small amount of loose gold glitter onto a smooth surface (an extra plastic lid lying around, a paper plate, etc), and dip a small brush into a clear brow gel, and then pick up some glitter with your brush. begin patting it on top of the gold eyeshadow that you applied earlier, but don’t extend it too much into the original brown eyeshadow. Be very careful not to get it too close to your water line or in your eye.
7. Now you’re going to line your upper lash line with a black gel liner and your lower lash line with a brown pencil. Using both browns + blacks through out this tutorial will keep things looking softer and not too harsh.
8. Dab a smudge brush into the chocolate brown eyeshadow and smudge it using a dabbing motion along your lower lash line, on top of the liner you just applied. This will help set the eyeliner and also help give you the smoky effect.
9. Curl your lashes and apply your favorite mascara (don’t forget to use waterproof if you’ll be dancing up a storm!). If you’d like, you can add false lashes to give your look some extra drama
Friday, December 23, 2011
How-To Beehive
Step 1: Cover a bath loofa in a solid fabric that matches your hair color
 Step 2: Pull one small section of hair forward (leave unteased).
Gather a second 1-2 inch section, spray and back-comb it. Repeat with 2-3 more sections until your hair looks like this…
 Step 3: Add the loofa to your hair.
Wherever you position the loofa will be where the bump sits. Cover the loofa with pieces of hair and pin each piece down. Continue to cover it from every direction until the loofa is completely hidden!

Step 4: Pull pieces from the sides of the hair back to cover the sides of the bump. This creates a beautiful shape.

Step 5: Choose to pull the back of the hair up or leave it down.
 ..
..
 A few tips: If you have shorter hair use just the fabric (tied in a big knot/ball) and skip the loofa.
Try a lace headband, daisy chain or style maiden braids in the front of your beehive. Practice makes perfect. Experiment to find out how much hairspray and teasing your hair needs
Gather a second 1-2 inch section, spray and back-comb it. Repeat with 2-3 more sections until your hair looks like this…
Wherever you position the loofa will be where the bump sits. Cover the loofa with pieces of hair and pin each piece down. Continue to cover it from every direction until the loofa is completely hidden!
Step 4: Pull pieces from the sides of the hair back to cover the sides of the bump. This creates a beautiful shape.
Step 5: Choose to pull the back of the hair up or leave it down.
Try a lace headband, daisy chain or style maiden braids in the front of your beehive. Practice makes perfect. Experiment to find out how much hairspray and teasing your hair needs
Maiden Braids

Maiden Braids:
Steps 1-2: Braid two strands on each side of a center part.
Steps 3-5: Wrap braids around the crown of your head and pin in place with one pin each. Step 6: Arrange braids so that they cover the front of your head like a headband. Pin into place more securely until you feel comfortable.
Steps 7-8: Pull the rest of the hair into a ponytail and pin it into a cute messy bun. Note: This step is optional. You can also wear your hair down.
Step 9: Add final pins and spray. Enjoy!
Hair Bow ;D
- 1. Start with a loose pony tail.
- 2. Take the rubber band (or pony tail holder)
- 3. Pull the hair through half-way.
- 4. Flip the tail to the other side and repeat, leaving a small tail remaining.
- 5.Take the tail, fold over the middle, and pin in place. From underneath pin both sides of the "bow" in place. Tug on the loops until you have a perfect, messy bow!
D.I.Y. Coffee Syrup
For the vanilla syrup you need:
- 2 cups water
- 2 cups sugar
- 1/2 teaspoon vanilla extract (the clear kind is much preferred here).
- In a small pot heat your water and sugar over low/medium heat, stirring constantly until the sugar has dissolved. Now stir in your vanilla extract and pour into your dispenser.
For the raspberry syrup you need:
- 2 cups water
- 2 cups sugar
- 1/2 cup fresh raspberries.
- In a small pot heat your water and sugar over low/medium heat, stirring constantly until the sugar has dissolved. Mash up the raspberries a little and then stir them in with the syrup, allow this to mingle for 3-5 minutes. Pour through a fine-mesh strainer to filter out any large raspberry pieces and seeds. Then pour into your dispenser.
For the caramel syrup you need:
- 2 cups water
- 2 cups sugar
- 1/2 cup caramel syrup
- In a small pot heat your water and sugar over low/medium heat, stirring constantly until the sugar has dissolved. Now stir in your caramel until well combined and pour into your dispenser.
Canvas
Transfer photo to canvas:
Supplies needed-
- Stretched canvas (I chose an 8x10 size),
- Gel medium (I used this kind from Liquidex
),
- Paint brush
- The image you want to transfer (laser copy)
- Spray bottle filled with water. -Remember, your image will print reversed.
1. Completely cover your canvas with gel medium. Use a heavy coat.
2. Press the photo copy onto the canvas and let it dry for several hours or overnight.
3. After your image is completely dry, use a spray bottle to wet the top of the paper.
4. Rub the surface with your fingers until pieces of the paper start coming off.
When pieces start coming up your image will be revealed.
Be careful not to rub too hard as this can remove your transfer on accident.
Continue until all the paper is removed and the image is completely visible!
5. Cover your canvas with one more coat of gel medium to seal and protect the image.
jhttp://abeautifulmess.typepad.com/my_weblog/2011/10/make-your-own-canvas-portrait.html


Beautiful Names ✿
| Adalia | Teutonic | Noble |
| Almira | Arabic | Princess |
| Amabelle | Latin | Loveable |
| Annabelle | Celtic | Joy |
| Athena | Greek | Wisdom |
| Belle, Bella | French | Beautiful |
| Daria | Persian | Queenly |
| Diana, Diane | Roman Mythology | Virgin Goddes of the Moon |
| Ethel | Teutonic | Noble |
| Elise | French | Form of Elizabeth |
| Eliza | Old French, Latin | The Chosen |
| Jade | Spanish | Jewel |
| Pearl | Latin | The Pearl |
| Rose, Rosalie | Italian | Rose |
| Serena | Latin | Serene |
| Selene, Selena | Greek | The Moon |
| Zoe | Greek | Life Giving |
Adalia - Noble
aurora: Latin: Gold / Greek: Goddess of the dawn
ariel: Hebrew: Like a beautiful melody / Lion of God
Subscribe to:
Comments (Atom)